1.Wazuh分布式部署架构
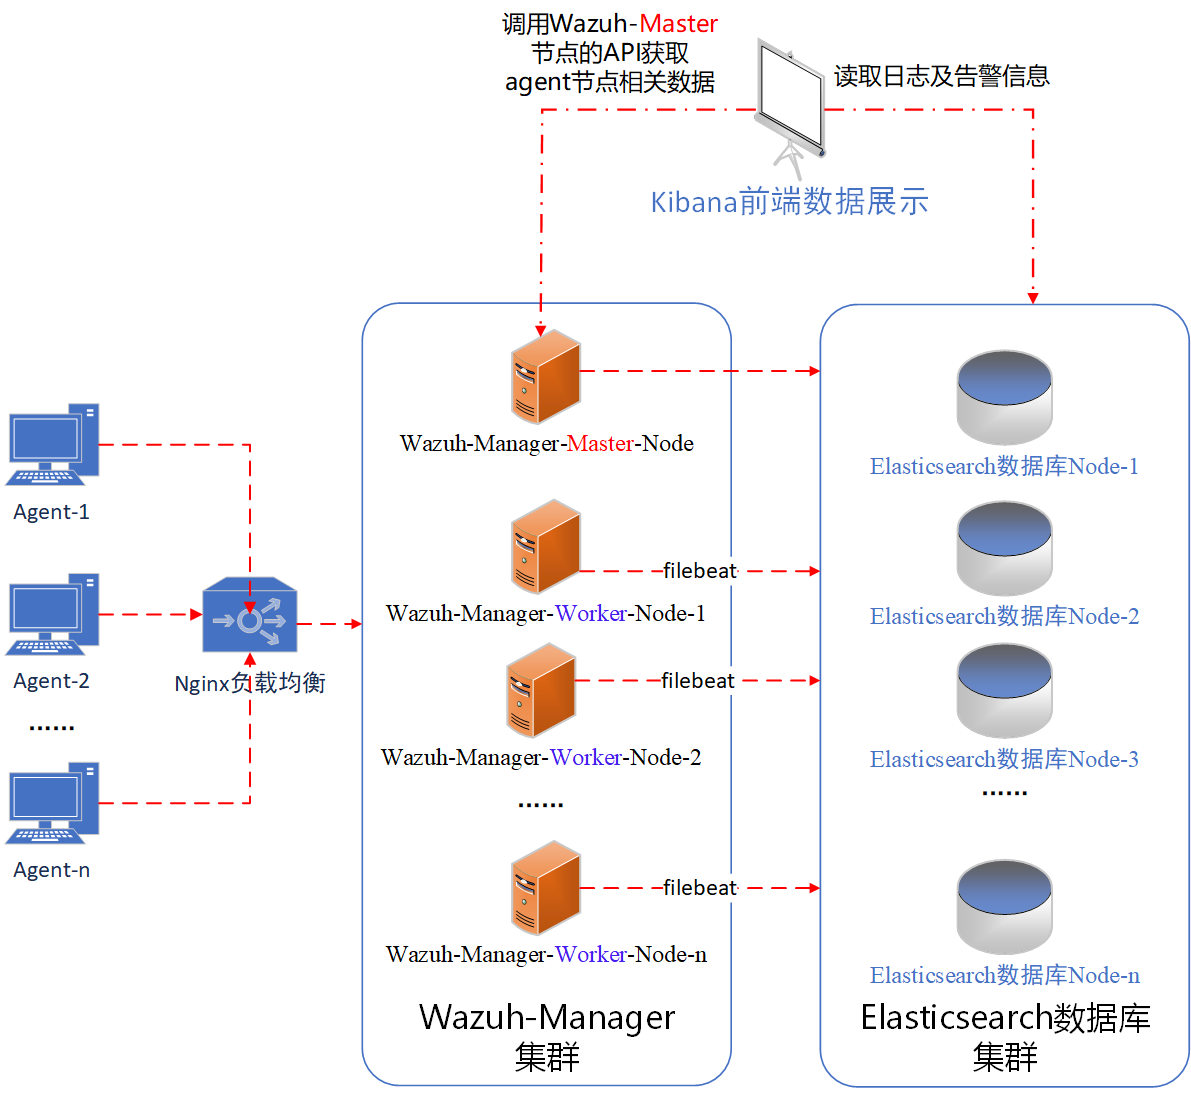
由于Wazuh中的日志分析匹配工作都是放在Manager节点中进行的,所以单台Manager节点所能支撑的agent数量是有限的。同样的,日积月累数据库中日志数量可能爆炸增长,导致查询速度缓慢。贴心的Wazuh支持部署成集群形式,通过增加集群中节点的数量整个系统将可以支持更多的agent。集群环境的整体架构如下图所示:
2.Wazuh集群安装
以下简单记录Wazuh集群的安装配置过程。
2.1 Elasticsearch数据库集群安装
集群中存在多个Elasticsearch节点,首个节点安装时需要生成证书用于保障通信安全,因此安装步骤与其余节点略有不同。
2.1.1 首个Elasticsearch节点安装
1.安装必要软件包
apt update
apt install curl apt-transport-https unzip wget software-properties-common
2.添加jdk源
add-apt-repository ppa:openjdk-r/ppa
3.安装jdk
apt update
export JAVA_HOME=/usr/ && apt install openjdk-11-jdk
4.添加Wazuh源
curl -s https://packages.wazuh.com/key/GPG-KEY-WAZUH | apt-key add -
echo "deb https://packages.wazuh.com/4.x/apt/ stable main" | tee -a /etc/apt/sources.list.d/wazuh.list
apt-get update
5.安装elasticsearch及opendistroforelasticsearch
apt install elasticsearch-oss opendistroforelasticsearch
6.修改elasticsearch数据库配置文件/etc/elasticsearch/elasticsearch.yml。节点数量和信息要和配置文件内容匹配。这里我一共两个elasticsearch节点,分别为:
- node-1:172.16.0.235
- node-2: 172.16.0.238
参考写入配置文件如下:
network.host: 0.0.0.0
node.name: node-1
cluster.name: elastic-cluster
cluster.initial_master_nodes:
        - node-1
        - node-2
discovery.seed_hosts:
        - 172.16.0.235
        - 172.16.0.238

node.master: true
node.data: true
node.ingest: true

opendistro_security.ssl.transport.pemcert_filepath: /etc/elasticsearch/certs/elasticsearch.pem
opendistro_security.ssl.transport.pemkey_filepath: /etc/elasticsearch/certs/elasticsearch.key
opendistro_security.ssl.transport.pemtrustedcas_filepath: /etc/elasticsearch/certs/root-ca.pem
opendistro_security.ssl.transport.enforce_hostname_verification: false
opendistro_security.ssl.transport.resolve_hostname: false
opendistro_security.ssl.http.enabled: true
opendistro_security.ssl.http.pemcert_filepath: /etc/elasticsearch/certs/elasticsearch_http.pem
opendistro_security.ssl.http.pemkey_filepath: /etc/elasticsearch/certs/elasticsearch_http.key
opendistro_security.ssl.http.pemtrustedcas_filepath: /etc/elasticsearch/certs/root-ca.pem
opendistro_security.nodes_dn:
- CN=node-1,OU=Docu,O=Jus4fun,L=Shanxi,C=CN
- CN=node-2,OU=Docu,O=Jus4fun,L=Shanxi,C=CN
opendistro_security.authcz.admin_dn:
- CN=admin,OU=Docu,O=Jus4fun,L=Shanxi,C=CN


opendistro_security.audit.type: internal_elasticsearch
opendistro_security.enable_snapshot_restore_privilege: true
opendistro_security.check_snapshot_restore_write_privileges: true
opendistro_security.restapi.roles_enabled: ["all_access", "security_rest_api_access"]
cluster.routing.allocation.disk.threshold_enabled: false
node.max_local_storage_nodes: 3

path.data: /var/lib/elasticsearch
path.logs: /var/log/elasticsearch
7.添加opendistro规则和用户
/usr/share/elasticsearch/plugins/opendistro_security/securityconfig/roles.yml写入如下内容:
_meta:
  type: "roles"
  config_version: 2

# Restrict users so they can only view visualization and dashboard on kibana
kibana_read_only:
  reserved: true

# The security REST API access role is used to assign specific users access to change the security settings through the REST API.
security_rest_api_access:
  reserved: true

# Allows users to view alerts
alerting_view_alerts:
  reserved: true
  index_permissions:
    - index_patterns:
      - ".opendistro-alerting-alert*"
      allowed_actions:
        - read

# Allows users to view and acknowledge alerts
alerting_crud_alerts:
  reserved: true
  index_permissions:
    - index_patterns:
      - ".opendistro-alerting-alert*"
      allowed_actions:
       - crud

# Allows users to use all alerting functionality
alerting_full_access:
  reserved: true
  index_permissions:
    - index_patterns:
      - ".opendistro-alerting-config"
      - ".opendistro-alerting-alert*"
      allowed_actions:
        - crud

wazuh_ui_user:
  reserved: true
  hidden: false
  cluster_permissions: []
  index_permissions:
  - index_patterns:
    - "wazuh-*"
    dls: ""
    fls: []
    masked_fields: []
    allowed_actions:
    - "read"
  tenant_permissions: []
  static: false

wazuh_ui_admin:
  reserved: true
  hidden: false
  cluster_permissions: []
  index_permissions:
  - index_patterns:
    - "wazuh-*"
    dls: ""
    fls: []
    masked_fields: []
    allowed_actions:
    - "read"
    - "delete"
    - "manage"
    - "index"
  tenant_permissions: []
  static: false
/usr/share/elasticsearch/plugins/opendistro_security/securityconfig/roles_mapping.yml
写入如下内容:
# In this file users, backendroles and hosts can be mapped to Open Distro Security roles.
# Permissions for Opendistro roles are configured in roles.yml

_meta:
  type: "rolesmapping"
  config_version: 2

# Define your roles mapping here

## Demo roles mapping

all_access:
  reserved: false
  backend_roles:
  - "admin"
  description: "Maps admin to all_access"

own_index:
  reserved: false
  users:
  - "*"
  description: "Allow full access to an index named like the username"

logstash:
  reserved: false
  backend_roles:
  - "logstash"

kibana_user:
  reserved: false
  backend_roles:
  - "kibanauser"
  users:
  - "wazuh_user"
  - "wazuh_admin"
  description: "Maps kibanauser to kibana_user"

readall:
  reserved: false
  backend_roles:
  - "readall"

manage_snapshots:
  reserved: false
  backend_roles:
  - "snapshotrestore"

kibana_server:
  reserved: true
  users:
  - "kibanaserver"

wazuh_ui_admin:
  reserved: true
  hidden: false
  backend_roles: []
  hosts: []
  users:
  - "wazuh_admin"
  - "kibanaserver"
  and_backend_roles: []

wazuh_ui_user:
  reserved: true
  hidden: false
  backend_roles: []
  hosts: []
  users:
  - "wazuh_user"
  and_backend_roles: []
/usr/share/elasticsearch/plugins/opendistro_security/securityconfig/internal_users.yml
写入如下内容:
# This is the internal user database
# The hash value is a bcrypt hash and can be generated with plugin/tools/hash.sh

_meta:
  type: "internalusers"
  config_version: 2

# Define your internal users here

## Demo users

admin:
  hash: "$2a$12$VcCDgh2NDk07JGN0rjGbM.Ad41qVR/YFJcgHp0UGns5JDymv..TOG"
  reserved: true
  backend_roles:
  - "admin"
  description: "Demo admin user"

kibanaserver:
  hash: "$2a$12$4AcgAt3xwOWadA5s5blL6ev39OXDNhmOesEoo33eZtrq2N0YrU3H."
  reserved: true
  description: "Demo kibanaserver user"

kibanaro:
  hash: "$2a$12$JJSXNfTowz7Uu5ttXfeYpeYE0arACvcwlPBStB1F.MI7f0U9Z4DGC"
  reserved: false
  backend_roles:
  - "kibanauser"
  - "readall"
  attributes:
    attribute1: "value1"
    attribute2: "value2"
    attribute3: "value3"
  description: "Demo kibanaro user"

logstash:
  hash: "$2a$12$u1ShR4l4uBS3Uv59Pa2y5.1uQuZBrZtmNfqB3iM/.jL0XoV9sghS2"
  reserved: false
  backend_roles:
  - "logstash"
  description: "Demo logstash user"

readall:
  hash: "$2a$12$ae4ycwzwvLtZxwZ82RmiEunBbIPiAmGZduBAjKN0TXdwQFtCwARz2"
  reserved: false
  backend_roles:
  - "readall"
  description: "Demo readall user"

snapshotrestore:
  hash: "$2y$12$DpwmetHKwgYnorbgdvORCenv4NAK8cPUg8AI6pxLCuWf/ALc0.v7W"
  reserved: false
  backend_roles:
  - "snapshotrestore"
  description: "Demo snapshotrestore user"

wazuh_admin:
  hash: "$2y$12$d2awHiOYvZjI88VfsDON.u6buoBol0gYPJEgdG1ArKVE0OMxViFfu"
  reserved: true
  hidden: false
  backend_roles: []
  attributes: {}
  opendistro_security_roles: []
  static: false

wazuh_user:
  hash: "$2y$12$BQixeoQdRubZdVf/7sq1suHwiVRnSst1.lPI2M0.GPZms4bq2D9vO"
  reserved: true
  hidden: false
  backend_roles: []
  attributes: {}
  opendistro_security_roles: []
  static: false
8.删除默认的证书
rm /etc/elasticsearch/esnode-key.pem /etc/elasticsearch/esnode.pem /etc/elasticsearch/kirk-key.pem /etc/elasticsearch/kirk.pem /etc/elasticsearch/root-ca.pem -f
9.建立证书文件夹
mkdir /etc/elasticsearch/certs
cd /etc/elasticsearch/certs
10.下载tlstool
curl -so ~/search-guard-tlstool-1.8.zip https://maven.search-guard.com/search-guard-tlstool/1.8/search-guard-tlstool-1.8.zip
11.解压tlstool
unzip ~/search-guard-tlstool-1.8.zip -d ~/searchguard
12.修改~/searchguard/search-guard.yml。根据elasticsearch及filebeat(wazuh-manager)的node数量修改配置文件。
# Self-signed certificate authority
ca:
   root:
      dn: CN=elasticsearch,OU=Docu,O=Jus4fun,L=Shanxi,C=CN
      keysize: 2048
      validityDays: 3650
      pkPassword: none
      file: root-ca.pem

# Default values and global settings
defaults:
      validityDays: 3650
      pkPassword: none
      generatedPasswordLength: 12
      httpsEnabled: true

# Nodes certificates
nodes:
  - name: node-1
    dn: CN=node-1,OU=Docu,O=Jus4fun,L=Shanxi,C=CN
    ip:
      - 172.16.0.235
  - name: node-2
    dn: CN=node-2,OU=Docu,O=Jus4fun,L=Shanxi,C=CN
    ip:
      - 172.16.0.238
  - name: kibana
    dn: CN=kibana,OU=Docu,O=Jus4fun,L=Shanxi,C=CN
    ip:
      - 172.16.0.237

# Clients certificates
clients:
  - name: admin
    dn: CN=admin,OU=Docu,O=Jus4fun,L=Shanxi,C=CN
    admin: true
  - name: filebeat-1
    dn: CN=filebeat-1,OU=Docu,O=Jus4fun,L=Shanxi,C=CN
  - name: filebeat-2
    dn: CN=filebeat-2,OU=Docu,O=Jus4fun,L=Shanxi,C=CN
13.生成证书及密钥并放置在elasticsearch的证书目录下
~/searchguard/tools/sgtlstool.sh -c ~/searchguard/search-guard.yml -ca -crt -t /etc/elasticsearch/certs/
mv /etc/elasticsearch/certs/node-1.pem /etc/elasticsearch/certs/elasticsearch.pem
mv /etc/elasticsearch/certs/node-1.key /etc/elasticsearch/certs/elasticsearch.key
mv /etc/elasticsearch/certs/node-1_http.pem /etc/elasticsearch/certs/elasticsearch_http.pem
mv /etc/elasticsearch/certs/node-1_http.key /etc/elasticsearch/certs/elasticsearch_http.key
14.压缩证书文件并拷贝至集群中其余所有节点(包括wazuh-manager和kibana)
tar -cf /etc/elasticsearch/certs/certs.tar *
拷贝至其余节点,这里我都拷贝到了/home/ubuntu/目录下
15.删除无用文件
rm /etc/elasticsearch/certs/client-certificates.readme /etc/elasticsearch/certs/elasticsearch_elasticsearch_config_snippet.yml search-guard-tlstool-1.7.zip filebeat* node-* -f
16.卸载无用插件
/usr/share/elasticsearch/bin/elasticsearch-plugin remove opendistro_performance_analyzer
17.重启elasticsearch使配置生效
systemctl daemon-reload
systemctl enable elasticsearch
systemctl start elasticsearch
2.1.2 其余Elasticsearch节点安装
1.安装必要软件
apt install curl apt-transport-https unzip wget software-properties-common
2.添加jdk源
add-apt-repository ppa:openjdk-r/ppa
3.安装jdk
apt update
export JAVA_HOME=/usr/ && apt install openjdk-11-jdk
4.添加Wazuh源
curl -s https://packages.wazuh.com/key/GPG-KEY-WAZUH | apt-key add -
echo "deb https://packages.wazuh.com/4.x/apt/ stable main" | tee -a /etc/apt/sources.list.d/wazuh.list
apt-get update
5.安装elasticsearch和opendistroforelasticsearch
apt install elasticsearch-oss opendistroforelasticsearch
6.修改es数据库配置文件/etc/elasticsearch/elasticsearch.yml。这里我只有两个节点,如下为node-2节点的配置文件。
network.host: 0.0.0.0
node.name: node-2
cluster.name: elastic-cluster
cluster.initial_master_nodes:
        - node-1
        - node-2
discovery.seed_hosts:
        - 172.16.0.235
        - 172.16.0.238

node.master: true
node.data: true
node.ingest: true

opendistro_security.ssl.transport.pemcert_filepath: /etc/elasticsearch/certs/elasticsearch.pem
opendistro_security.ssl.transport.pemkey_filepath: /etc/elasticsearch/certs/elasticsearch.key
opendistro_security.ssl.transport.pemtrustedcas_filepath: /etc/elasticsearch/certs/root-ca.pem
opendistro_security.ssl.transport.enforce_hostname_verification: false
opendistro_security.ssl.transport.resolve_hostname: false
opendistro_security.ssl.http.enabled: true
opendistro_security.ssl.http.pemcert_filepath: /etc/elasticsearch/certs/elasticsearch_http.pem
opendistro_security.ssl.http.pemkey_filepath: /etc/elasticsearch/certs/elasticsearch_http.key
opendistro_security.ssl.http.pemtrustedcas_filepath: /etc/elasticsearch/certs/root-ca.pem
opendistro_security.nodes_dn:
- CN=node-1,OU=Docu,O=Jus4fun,L=Shanxi,C=CN
- CN=node-2,OU=Docu,O=Jus4fun,L=Shanxi,C=CN
opendistro_security.authcz.admin_dn:
- CN=admin,OU=Docu,O=Jus4fun,L=Shanxi,C=CN


opendistro_security.audit.type: internal_elasticsearch
opendistro_security.enable_snapshot_restore_privilege: true
opendistro_security.check_snapshot_restore_write_privileges: true
opendistro_security.restapi.roles_enabled: ["all_access", "security_rest_api_access"]
cluster.routing.allocation.disk.threshold_enabled: false
node.max_local_storage_nodes: 3

path.data: /var/lib/elasticsearch
path.logs: /var/log/elasticsearch
7.部署证书及密钥文件。其中node-X中的X替换为当前节点的编号。
mkdir /etc/elasticsearch/certs
mv /home/ubuntu/certs.tar /etc/elasticsearch/certs/
cd /etc/elasticsearch/certs/
tar -xf certs.tar node-X.pem node-X.key node-X_http.pem node-X_http.key root-ca.pem
mv /etc/elasticsearch/certs/node-X.pem /etc/elasticsearch/certs/elasticsearch.pem
mv /etc/elasticsearch/certs/node-X.key /etc/elasticsearch/certs/elasticsearch.key
mv /etc/elasticsearch/certs/node-X_http.pem /etc/elasticsearch/certs/elasticsearch_http.pem
mv /etc/elasticsearch/certs/node-X_http.key /etc/elasticsearch/certs/elasticsearch_http.key
8.删除无用文件
rm /etc/elasticsearch/certs/client-certificates.readme /etc/elasticsearch/certs/elasticsearch_elasticsearch_config_snippet.yml search-guard-tlstool-1.7.zip filebeat* node-* -f
9.卸载无用插件
/usr/share/elasticsearch/bin/elasticsearch-plugin remove opendistro_performance_analyzer
10.重启服务
systemctl daemon-reload
systemctl enable elasticsearch
systemctl start elasticsearch
2.1.3 初始化集群
在第一个安装的es数据库节点上执行如下命令进行初始化:
/usr/share/elasticsearch/plugins/opendistro_security/tools/securityadmin.sh -cd /usr/share/elasticsearch/plugins/opendistro_security/securityconfig/ -icl -nhnv -cacert /etc/elasticsearch/certs/root-ca.pem -cert /etc/elasticsearch/certs/admin.pem -key /etc/elasticsearch/certs/admin.key -h <elasticsearch_IP>
其中<elasticsearch_IP>替换为第一个安装的es数据库节点的ip地址。
完成上述初始化后即可使用如下命令测试安装是否成功,若安装成功则显示如下图所示内容:
curl -XGET https://localhost:9200/_cat/nodes -u admin:admin -k

2.2 Wazuh-Manger集群安装
Wazuh-Manger集群中需要有一个控制节点即Master节点,其余的被成为Worker节点。二者仅配置文件略有不同。以下为Master节点和Worker节点均需要进行的安装过程。
1.安装必要软件
apt update
apt install curl apt-transport-https lsb-release gnupg2
2.添加wazuh源
curl -s https://packages.wazuh.com/key/GPG-KEY-WAZUH | apt-key add -
echo "deb https://packages.wazuh.com/4.x/apt/ stable main" | tee -a /etc/apt/sources.list.d/wazuh.list
apt-get update
3.安装wazuh-manager
apt-get install wazuh-manager
2.2.1 Master节点配置文件修改
修改配置文件/var/ossec/etc/ossec.conf中的<cluster>节。Master节点的参考如下:
  <cluster>
    <name>Jus4fun</name>
    <node_name>masterNode</node_name>
    <node_type>master</node_type>
    <key>c37cd4b580c3e51cab31f5cbbf0ea6f0</key>
    <port>1516</port>
    <bind_addr>0.0.0.0</bind_addr>
    <nodes>
        <node>172.16.0.244</node>
    </nodes>
    <hidden>no</hidden>
    <disabled>no</disabled>
  </cluster>
其中node中填写的ip为Master节点的ip,key值可以使用如下命令生成,需要注意其余节点的key值必须相同:
openssl rand -hex 16
配置修改后需要重启服务
systemctl daemon-reload
systemctl enable wazuh-manager
systemctl start wazuh-manager
2.2.2 Worker节点配置文件修改
修改配置文件/var/ossec/etc/ossec.conf中的<cluster>节。Worker节点的参考如下:
  <cluster>
    <name>Jus4fun</name>
    <node_name>workerNode01</node_name>
    <node_type>worker</node_type>
    <key>c37cd4b580c3e51cab31f5cbbf0ea6f0</key>
    <port>1516</port>
    <bind_addr>0.0.0.0</bind_addr>
    <nodes>
        <node>172.16.0.244</node>
    </nodes>
    <hidden>no</hidden>
    <disabled>no</disabled>
  </cluster>
注意,这里的node里,依旧填写master节点的ip。修改后重启服务:
systemctl daemon-reload
systemctl enable wazuh-manager
systemctl start wazuh-manager
2.2.3 安装filebeat
此处master节点和worker节点安装过程相同。
1.安装filebeat
apt-get install filebeat
2.修改filebeat配置文件/etc/filebeat/filebeat.yml,写入如下内容。注意,hosts里面填入所有es数据库节点的地址。
# Wazuh - Filebeat configuration file
output.elasticsearch:
  hosts: ["172.16.0.235:9200", "172.16.0.238:9200"]
  protocol: https
  username: "admin"
  password: "admin"
  ssl.certificate_authorities:
    - /etc/filebeat/certs/root-ca.pem
  ssl.certificate: "/etc/filebeat/certs/filebeat.pem"
  ssl.key: "/etc/filebeat/certs/filebeat.key"
setup.template.json.enabled: true
setup.template.json.path: '/etc/filebeat/wazuh-template.json'
setup.template.json.name: 'wazuh'
setup.ilm.overwrite: true
setup.ilm.enabled: false

filebeat.modules:
  - module: wazuh
    alerts:
      enabled: true
    archives:
      enabled: false
3.添加es数据库alerts模版文件/etc/filebeat/wazuh-template.json。注意,raw.githubusercontent.com可能被防火墙墙。
curl -so /etc/filebeat/wazuh-template.json https://raw.githubusercontent.com/wazuh/wazuh/4.1/extensions/elasticsearch/7.x/wazuh-template.json
chmod go+r /etc/filebeat/wazuh-template.json
4.安装filebeat的wazuh插件
curl -s https://packages.wazuh.com/4.x/filebeat/wazuh-filebeat-0.1.tar.gz | tar -xvz -C /usr/share/filebeat/module
5.配置filebeat证书,其中filebeat-X中的X替换为对应节点编号。
mkdir /etc/filebeat/certs
mv /home/ubuntu/certs.tar /etc/filebeat/certs/
cd /etc/filebeat/certs/
tar -xf certs.tar filebeat-X.pem filebeat-X.key root-ca.pem
mv /etc/filebeat/certs/filebeat-X.pem /etc/filebeat/certs/filebeat.pem
mv /etc/filebeat/certs/filebeat-X.key /etc/filebeat/certs/filebeat.key
6.重启服务
systemctl daemon-reload
systemctl enable filebeat
systemctl start filebeat
2.2.4 验证安装
1.首先需要验证各节点是否成功加入集群。可以在任意节点执行如下命令检测。
/var/ossec/bin/cluster_control -l

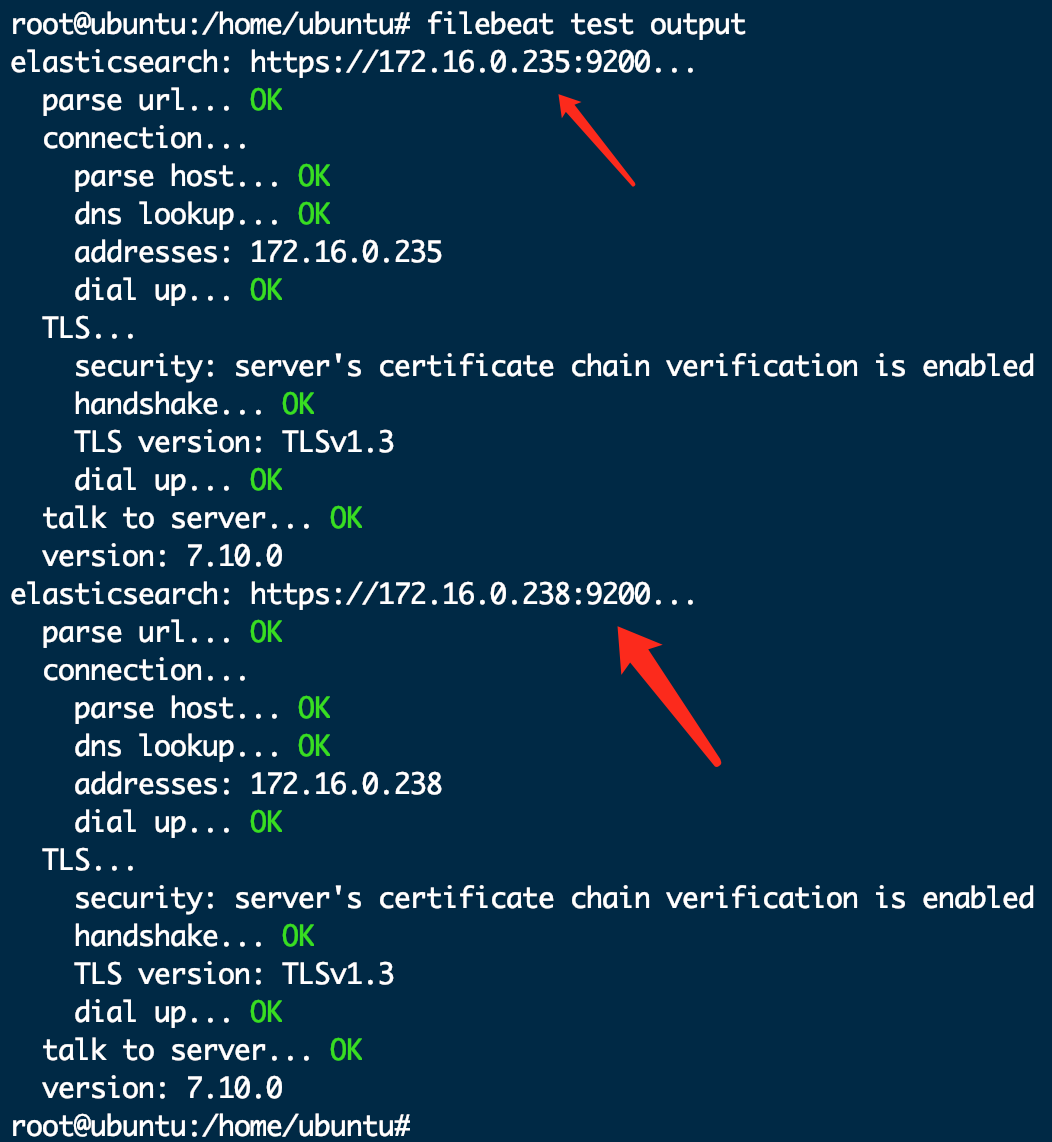
2.验证filebeat和es数据库的连接情况,在任意节点执行以下命令。应能看的所有es数据库的响应输出。
filebeat test output
2.3 Nginx负载均衡安装
1.安装nginx
apt update
apt install nginx
2.添加负载均衡配置,修改/etc/nginx/nginx.conf,添加如下内容:
stream {
    upstream cluster {
        hash $remote_addr consistent;
        server 172.16.0.244:1514;
        server 172.16.0.234:1514;
    }
    upstream master {
        server 172.16.0.244:1515;
    }
    server {
        listen 1514;
        proxy_pass cluster;
    }
    server {
        listen 1515;
        proxy_pass master;
    }
}
其中upstream master中填入wazuh-Manager的master节点的ip。cluster里面填入所有节点的地址。
2.4 Kibana安装
1.安装依赖软件
apt install curl apt-transport-https libcap2-bin
2.添加wazuh源
curl -s https://packages.wazuh.com/key/GPG-KEY-WAZUH | apt-key add -
echo "deb https://packages.wazuh.com/4.x/apt/ stable main" | tee -a /etc/apt/sources.list.d/wazuh.list
apt-get update
3.安装kibana
apt-get install opendistroforelasticsearch-kibana
4.修改kibana配置文件/etc/kibana/kibana.yml。这里es的hosts有几个就填几个。
server.host: 0.0.0.0
elasticsearch.hosts: ["https://172.16.0.235:9200", "https://172.16.0.238:9200"]
server.port: 443
elasticsearch.ssl.verificationMode: certificate
elasticsearch.username: kibanaserver
elasticsearch.password: kibanaserver
elasticsearch.requestHeadersWhitelist: ["securitytenant","Authorization"]
opendistro_security.multitenancy.enabled: false
opendistro_security.readonly_mode.roles: ["kibana_read_only"]
server.ssl.enabled: true
server.ssl.key: "/etc/kibana/certs/kibana.key"
server.ssl.certificate: "/etc/kibana/certs/kibana.pem"
elasticsearch.ssl.certificateAuthorities: ["/etc/kibana/certs/root-ca.pem"]
server.defaultRoute: /app/wazuh
5.创建kibana数据文件夹
mkdir /usr/share/kibana/data
chown -R kibana:kibana /usr/share/kibana/data
6.将编译好的Wazuh Kibana插件拷贝至/usr/share/kibana,这里插件代码我的放在了/home/ubuntu目录下
apt install unzip
unzip /home/ubuntu/wazuh-kibana-app.zip
mv /home/ubuntu/kibana/wazuh/ /usr/share/kibana/plugins/
7.启动一下服务生成插件的配置文件
systemctl daemon-reload
systemctl enable kibana
systemctl start kibana
8.添加证书,证书为安装第一个es节点的时候生成的。这里我放到了/home/ubuntu目录下
mkdir /etc/kibana/certs
mv /home/ubuntu/certs.tar /etc/kibana/certs/
cd /etc/kibana/certs/
tar -xf certs.tar kibana_http.pem kibana_http.key root-ca.pem
mv /etc/kibana/certs/kibana_http.key /etc/kibana/certs/kibana.key
mv /etc/kibana/certs/kibana_http.pem /etc/kibana/certs/kibana.pem
rm -f certs.tar
9.修改kibana-wazuh插件配置文件,连接wazuh-cluster-master的api。配置文件位于/usr/share/kibana/data/wazuh/config/wazuh.yml。修改url地址为wazuh-cluster-master的api地址。
hosts:
  - default:
     url: https://172.16.0.244
     port: 55000
     username: wazuh-wui
     password: wazuh-wui
     run_as: false
10.给kibana开启443端口的权限
setcap 'cap_net_bind_service=+ep' /usr/share/kibana/node/bin/node
11.重启服务
systemctl restart kibana