1.C++知识补充
1.1 构造函数
为了便于结构体或者类在生成某个具体的对象时可以方便的设置初值,因而使用构造函数,构造函数和结构体或者类同名,具体使用方式如下:
struct Person{
    int age;
    int level;
    Person(){
        printf("Person对象创建了\n");
    }
    Person(int age,int level){
        this->age = age;
        this->level = level;
    }
    void Print(){
        printf("%d-%d\n",age,level);
    }
};
1.2 析构函数
主要用于清理工作,比如一个结构体当中动态申请了内存,就要使用析构函数统一释放内存空间,代码如下:
#include "malloc.h"

struct Person
{
    int age;
    int level;
    char* arr;
    Person()
    {
        printf("无参构造函数执行了...");
    }
    Person(int age,int level)
    {
        printf("有参构造函数执行了...");
        this->age = age;
        this->level = level;
        arr = (char*)malloc(1024);
    }
    ~Person()
    {
        printf("析构函数执行了...");
        free(arr);
        arr = NULL;
    }
    void Print()
    {
        printf("%d-%d\n",age,level);
    }
};
1.3 继承
1.3.1 什么是继承?
就是数据复制,比如一个结构体当中想用另一个结构体的结构,就可以继承那个结构体,可以减少代码的重复编写。
struct Person
{
    int age;
    int sex;
};
struct Teacher:Person
{
    int level;
    int classId;
};
struct Student:Person
{
    int code;
    int score;
};
注:
- 1.Person 称为父类或者基类
- 2.Teacher、Student称为子类或者派生类
1.3.2 多重继承
一个子类可以同时继承多个父类,写法如下:
struct Z:X,Y
{
    int e;
    int f;
};
1.3.3 继承的特性
允许有同名变量,但使用时需要区分清楚,如下:
struct X
{
    int a;
    int b;
};
struct Y
{
    int a;
    int d;
};
struct Z:X,Y
{
    int e;
    int f;
};

Z z;
z.X::a = 1;
1.4 将定义和实现分离
将定义个实现分离可以提高代码的可读性,使用方法如下:
//xxx.h文件
struct Test
{
    int x;
    int y;
    int z;

    void Init(int x,int y,int z);
    void Function1();
};
//xxx.cpp
void Test::Init(int x,int y,int z)
{
    this->x = x;
    this->y = y;
    this->z = z;
}
void Test::Function1()
{
    printf("Function1:%x\n",x);
}
1.5 C++权限控制
1.5.1 public和private
- 1.public的意思是,这个成员哪里都可以用,不用担心被修改,所以,一旦发布成public的成员,是不能够改名字的.
- 2.private的意思是,这个成员只用于内部使用,不要在其他的地方使用.
使用样例:
struct Test
{
private:
    int x;
public:
    int y;
    void Init(int x,int y)
    {
        this->x = x;
        this->y = y;
    }
};
1.5.2 class与struct的区别
1.5.2.1 权限中的区别
编译器默认class中的成员为private 而struct中的成员为public.
1.5.2.2 继承中的区别
struct默认不改变父类成员的属性,但是class默认会把成员变成private。默认情况的继承如下:
class Base
{
public:
    int x;
    int y;
};
class Sub:Base
{
public:
    int a;
    int b;
};
其中class Sub:Base等价于
class Sub:private Base
{
public:
    int a;
    int b;
};
如果不希望改变成员的属性应使用如下写法:
class Sub:public Base
{
public:
    int a;
    int b;
};
1.6 虚函数
声明时带了virtual的函数就是虚函数,如下
class Base
{
public:
    int x;
    int y;
    virtual void Function_1()
    {
        printf("Function_1...\n");
    }
    virtual void Function_2()
    {
        printf("Function_2...\n");
    }
};
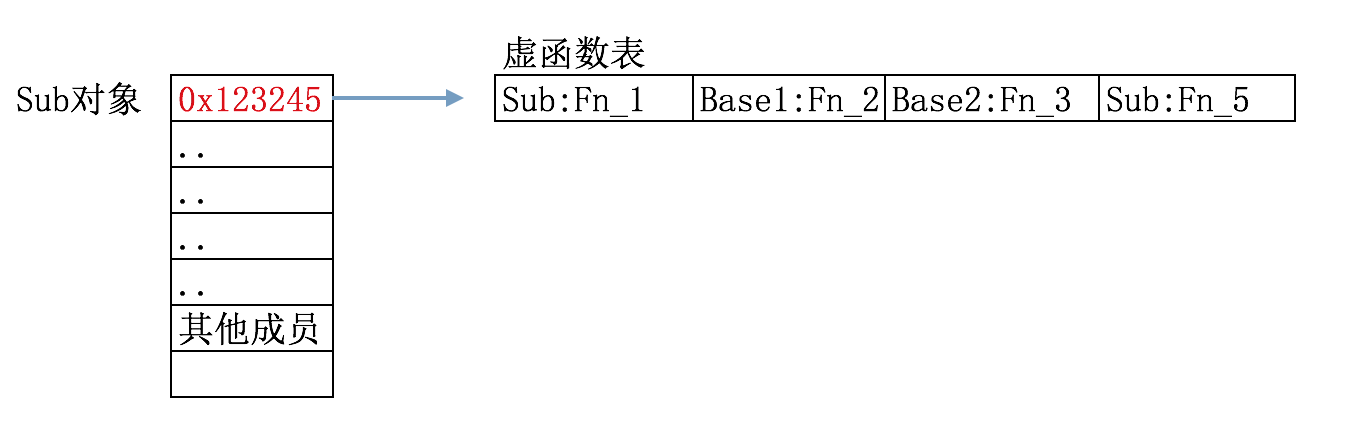
当类中有虚函数时,会多一个属性,4个字节。多出的属性是一个地址,指向一张表,里面存储了所有虚函数的地址。
1.7 各种与重写继承下的虚函数表
1.7.1 单继承和多重继承覆盖
单继承无覆盖情况下虚函数表会单纯的变大,但还是一张虚函数表,并且子类会复写主类的虚函数,样例代码如下:
struct Base1
{
public:
    virtual void Fn_1()
    {
        printf("Base1:Fn_1...\n");
    }
    virtual void Fn_2()
    {
        printf("Base1:Fn_2...\n");
    }
};
struct Base2:Base1
{
public:
    virtual void Fn_1()
    {
        printf("Base2:Fn_1...\n");
    }
    virtual void Fn_3()
    {
        printf("Base2:Fn_3...\n");
    }
};
struct Sub:Base2
{
public:
    virtual void Fn_1()
    {
        printf("Sub:Fn_1...\n");
    }
    virtual void Fn_5()
    {
        printf("Sub:Fn_5...\n");
    }
};
int main(int argc, char* argv[])
{
    //查看 Sub 的虚函数表
    Sub sub;

    //观察大小:虚函数表只有一个
    printf("%x\n",sizeof(sub));

    //通过函数指针调用函数,验证正确性
    typedef void(*pFunction)(void);


    //对象的前四个字节是就是虚函数表
    printf("Sub 的虚函数表地址为:%x\n",*(int*)&sub);

    pFunction pFn;

    for(int i=0;i<6;i++)
    {
        int temp = *((int*)(*(int*)&sub)+i);
        if(temp == 0)
        {
            break;
        }
        pFn = (pFunction)temp;
        pFn();
    }

    return 0;
}
以上代码虚函数表如下图所示:
1.7.2 多继承覆盖
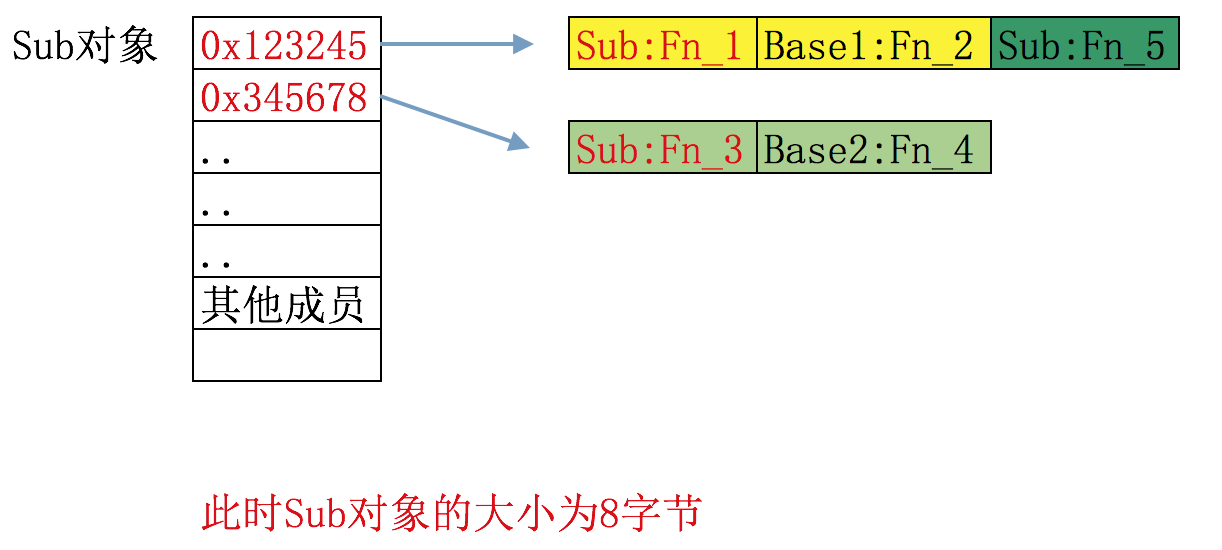
一个子类继承多个主类的情况下,会继承多个主类的多个虚函数表,样例代码如下:
struct Base1
{
public:
    virtual void Fn_1()
    {
        printf("Base1:Fn_1...\n");
    }
    virtual void Fn_2()
    {
        printf("Base1:Fn_2...\n");
    }
};
struct Base2
{
public:
    virtual void Fn_3()
    {
        printf("Base2:Fn_3...\n");
    }
    virtual void Fn_4()
    {
        printf("Base2:Fn_4...\n");
    }
};
struct Sub:Base1,Base2
{
public:
    virtual void Fn_1()
    {
        printf("Sub:Fn_1...\n");
    }
    virtual void Fn_3()
    {
        printf("Sub:Fn_3...\n");
    }
    virtual void Fn_5()
    {
        printf("Sub:Fn_5...\n");
    }
};
int main(int argc, char* argv[])
{
    //查看 Sub 的虚函数表
    Sub sub;

    //通过函数指针调用函数,验证正确性
    typedef void(*pFunction)(void);


    //对象的前四个字节是第一个Base1的虚表
    printf("Sub 的虚函数表地址为:%x\n",*(int*)&sub);

    pFunction pFn;

    for(int i=0;i<6;i++)
    {
        int temp = *((int*)(*(int*)&sub)+i);
        if(temp == 0)
        {
            break;
        }
        pFn = (pFunction)temp;
        pFn();
    }

    //对象的第二个四字节是Base2的虚表
    printf("Sub 的虚函数表地址为:%x\n",*(int*)((int)&sub+4));

    pFunction pFn1;

    for(int k=0;k<2;k++)
    {
        int temp = *((int*)(*(int*)((int)&sub+4))+k);
        pFn1 = (pFunction)temp;
        pFn1();
    }

    return 0;
}
以上代码的虚函数表如下图所示:
1.8 绑定
1.8.1 什么是绑定?
绑定就是将函数调用与地址关联起来。
1.8.2 前期绑定
就是编译完了就已经知道那个函数具体调用的地址了,硬编码使用的E8的call。
1.8.3 运行期间绑定(也叫动态绑定或者晚绑定)
运行期间绑定就是所谓的多态,编译完成后不能确定到底调用的函数地址是哪个地址,一般反映到硬编码里就是对应的FF的call。
注:只有virtual的函数是动态绑定.
1.9 模板
为了减少代码重复编写量,比如避免同一个函数因为参数类型不同编写多次,用法如下:
template<class test>
void test(test a){
    printf("%x",a+1);
}
1.10 引用类型
void test(int& x){
    x=1;
}
int main(){
    int x=2;
    test( x);//此时x变成了1
}
1.11 友元函数
如果在某个函数中需要直接访问某一个类的私有成员时,就可以在类中声明这个函数是该类的友元函数从而实现直接访问。样例代码如下:
 class Person
{
private:
    int x;
    int y;
public:
    Person(int x,int y)
    {
        this->x = x;
        this->y = y;
    }
    //声明友元函数
    friend void Print(const  Person p);
};
void Print(const Person p)
{
    printf("%d\n",refPer.x);
    printf("%d\n",refPer.y);
}
int main(int argc, char* argv[])
{
    Person p(1,2);
    Print(p);
    return 0;
}
1.12 运算符重载
比如加号、减号、大于这些运算如果对于一个结构体用起来有局限性,为了写起来方便所以有了运算符重置。样例代码如下:
class Number
{
private:
    int lowValue;
    int highValue;
public:
    Number(int lowValue,int highValue);
    void Print();
    Number operator++();
    Number operator--();
    Number operator+(const Number& p);
    Number operator-(const Number& p);
    Number operator*(const Number& p);
    Number operator/(const Number& p);
    bool operator>(const Number& p);
    bool operator<(const Number& p);
    bool operator==(const Number& p);
};
Number::Number(int lowValue,int highValue)
{
    this->lowValue = lowValue;
    this->highValue = highValue;
}
void Number::Print()
{
    printf("%d\n",lowValue);
    printf("%d\n",highValue);
}
Number Number::operator++()
{
    lowValue++;
    highValue++;
    return *this;
}
Number Number::operator--()
{
    lowValue--;
    highValue--;
    return *this;
}
Number Number::operator+(const Number& p)
{
    this->highValue = this->highValue + p.highValue;
    this->lowValue = this->lowValue + p.lowValue;
    return *this;
}
Number Number::operator-(const Number& p)
{
    this->highValue = this->highValue - p.highValue;
    this->lowValue = this->lowValue - p.lowValue;
    return *this;
}
Number Number::operator*(const Number& p)
{
    this->highValue = this->highValue * p.highValue;
    this->lowValue = this->lowValue * p.lowValue;
    return *this;
}
Number Number::operator/(const Number& p)
{
    this->highValue = this->highValue / p.highValue;
    this->lowValue = this->lowValue / p.lowValue;
    return *this;
}
bool Number::operator>(const Number& p)
{
    if(this->highValue > p.highValue)
    {
        return true;
    }
    return false;
}
bool Number::operator<(const Number& p)
{
    if(this->highValue < p.highValue)
    {
        return true;
    }
    return false;
}
bool Number::operator==(const Number& p)
{
    if(this->highValue == p.highValue)
    {
        return true;
    }
    return false;
}
void Test()
{
    Number p(1,2),p2(3,4);
    p++;
    p.Print();
    p--;
    p.Print();

    p = p+p2;
    p.Print();

}
int main(int argc, char* argv[])
{
    Test();


    return 0;
}
1.13 new和delete
1.13.1 new
能够在堆区分配一定的空间,其实最底层调用的就是HeapAlloc函数,示例用法如下:
int* pi = new int;
以上这段代码其实作用上等价于如下代码:
int* pi = malloc(sizeof(int));
1.13.2 delete
能够释放用new分配的空间,其实底层和free一样都是调用了HeapFree,示例用法如下:
int* pi = new int;
delete pi;
int* i =new int[5];//创建五个int
delete[] i;//删除刚刚创建的五个int
1.14 Vector(向量)
其实就是一个可动态扩充的动态数组,支持下标访问。
注:这一讲后面还有链表和二叉树,太熟悉了不写了